It's starting to get down to the wire...less than a month until the big day. One of my bridesmaids asked if I was going to provide jewelry for the girls or if I wanted them to go out and get their own. Up until this point, I really haven't wanted everything to be matchy matchy but then I began searching the internet for vintage/romantic necklaces that I could make for the girls and voila! I found the perfect inspiration!
From there, I had it in my head that somehow in between naps and at night after Luke went to bed, I'd create these necklaces for my bridesmaids. Here's a DIY tutorial on how I created them but keep in mind that these are very "free flow" and you can change them up in different ways to make them look completely different:
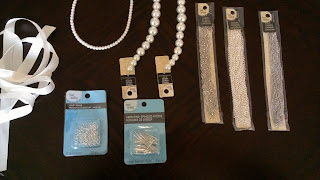
What you'll need (all can be found at your local craft store):
ribbon (about 5/8" wide)
chain (3 different kinds - I went for the thinner chain but thick would look great too)
pearl beads (2 different sizes and colors)
jump rings
head pins
wire grips (I'm actually not quite sure what the real name of these things are but they're used a lot in beading and look very much like needle nose pliers)
How to do it:
1. Connect all three chain ends together using a jump ring
2. Cut two pieces of ribbon in equal length (keep in mind that this will be the entire length of your necklace. You can always cut it shorter later...but you won't be able to make it longer. I cut my pieces 41 inches long)
3. Thread both pieces through the jump ring. The ribbon that doesn't lay with the chain (upper left hand corner in the picture below) will be the piece above the knot on the side of your neck that connects with the clasp in the back
4.Tie a knot with both pieces of ribbon around the jump ring. This prevents the chain from slipping after you've completed the necklace and it also hides the jump ring.
5. "Braid," and I use that term loosely, the chain and the ribbon. This is not a traditional braid but a messy one. There are no rules when it comes to intertwining except if you want more of a messy look, allow the chain to hang more. If you want a cleaner look, tighten the chain up. Keep in mind that the pearl beads that you will be hanging from the necklace have some weight and will pull down on the chain slightly.
6. Once you're happy with your "braid", connect the loose ends of the braided chains together using another jump ring. Thread the braided ribbon through the jump ring and tie a knot (again, to hide the jump ring and prevent the chains from slipping down the ribbon later.
7. Now it's time to start adding the pearl beads. Put a head pin through the pearl bead and using the wire grips, create a hook in the end (you may need to cut off the excess if your head pin is too long). Hook the head pin through the chain (anywhere) and tighten the hook to create a closed loop.
8. Continue all over then necklace until you feel that you have enough. Again, if you want a messier look, place the pearl beads all over. If you want a cleaner look, try to keep things more symmetrical. This was the hardest step for me because the chain would pull every which direction and I kept having to play with it until it looked right.
*Tip: by hooking two chains together when putting on a pearl bead, it will help keep the necklace from unraveling or acting "difficult"
9. Put the necklace around your neck and decide the length that you want. You can put clasps on the end or tie in a bow. I kept mine in a bow. Ta da, you have yourself a completed vintage bridesmaid necklace! I'd love to hear your feedback and see how your necklace turned out!


No comments:
Post a Comment